
Menu Template Instructions (Navigation Bar)
To change the Menu Template layout the head administrator should follow the instructions below.
You also have the option to submit an excel spreadsheet with the desired changes via the support tracker.
Overview
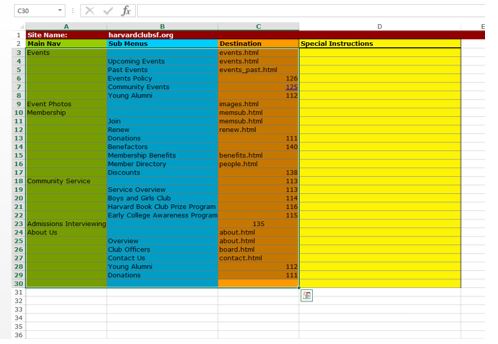
The Menu Template (Navigation Bar) is an excel spreadsheet that details instructions for the navigation bar for your website. The spreadsheet has three columns that represent the main navigation, the sub-menu items and the destinations. There is a copy of the existing layout in your file vault.
Column A: Main Nav: This is the text that will be displayed in your main menu.
Column B: Sub Menus: This column represents all of your submenu items. The submenu is displayed as a drop down from the main navigation. The sub menu consists of links to additional pages on your site. For example, when you roll your cursor over the membership menu, you'll see Join, Member Directory, etc.
Column C: Destination: The third column instructs the website on where the menu items will point to when a user clicks on the link. The destination of the sub menu items in your nav bar need to include articles numbers that you have created in “Manage Articles”. AlumniMagnet also has a set of articles that they have added to the site called “pre-created articles”*.
|
|
A |
B |
C |
|
1 |
Site Name: |
Your domain.org |
|
|
2 |
Main Nav |
Sub Menus |
Destination |
|
3 |
About Us |
||
|
4 |
Board |
board.html |
|
|
5 |
Contact Us |
contact.html |
|
|
6 |
FAQ |
faq.html |
|
|
7 |
Special Announcements |
101 |
|
|
8 |
Membership |
||
|
9 |
Join |
memsub.html |
|
|
10 |
Member Directory |
people.html |
|
|
11 |
Events |
||
|
12 |
Upcoming Events |
events.html |
|
|
13 |
Past Events |
events_past.html |
* Pre-created Articles
- The pre-created articles are examples of pages that are most common for Clubs and SIGs. Pre-created articles include Officers, Join, President Message, FAQ, Privacy Policy, etc. To see the full list of pre-created articles, go to the last page of the Menu Template excel worksheet or in “Manage Articles” (all articles below #100).
- The Pre-created pages have a shortcut in addition to an article number. For example, article #2 is also the about.html page. You can use the shortcut URL for these pages or the article #.
- Some of the pre-created pages also have additional functionality attached. The Join page for example (memsub.html) is populated by the membership levels in “Manage Memberships”. The top of the memsub.html page is article #4.
- Pre-created pages cannot be customized. These are pages are stock functionality.
How to implement Menu changes:
- On the excel document, highlight and copy only the first 3 columns. Do not highlight any columns past column C – the destination column. It will look something like this:
- Add /user.html?admin_menu to the end of your website url address. For example: https://officerslounge.clubs.harvard.edu/user.html?admin_menu
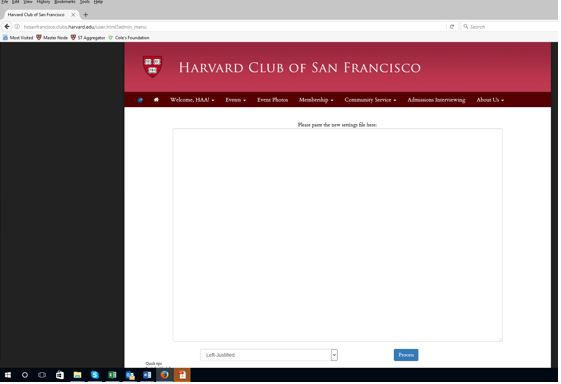
- Paste the copied content
* important note: Make sure that there are no extra spaces or paragraphs beyond the pasted data.
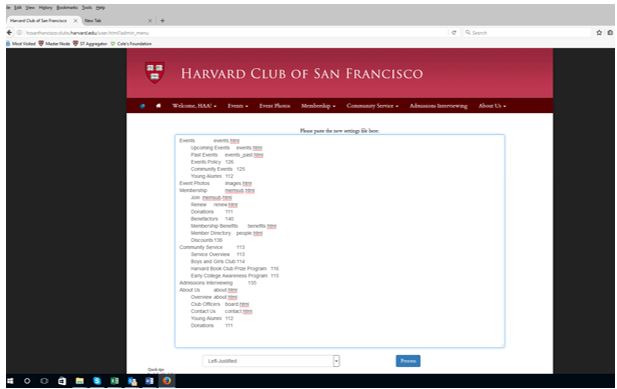
- Choose if the menu items should be left or right justified.
- Click “Process”. The navigation bar should have changed according to your directions.
- Hover over the menu items to make sure the changes took. If anything looks strange, click undo.
- You are now free to continue with other admin functions.
- Upload the new excel spreadsheet to Manage Files & Images. When you would like to make another change – just edit the most recent spreadsheet.
- If you run into any issues – please call 800-654-6494 or email chandra_mohammed@harvard.edu